
Creating a model in Blender involves several steps, including modeling, texturing, and possibly rigging and animating depending on your project. Here's a basic guide to get you started with creating a simple 3D model:
Step 1: Open Blender and Set Up
Open Blender and clear the default scene by selecting everything (press A) and then deleting (press X or Delete).

Step 2: Add a Mesh Object
Press Shift + A to open the Add menu.
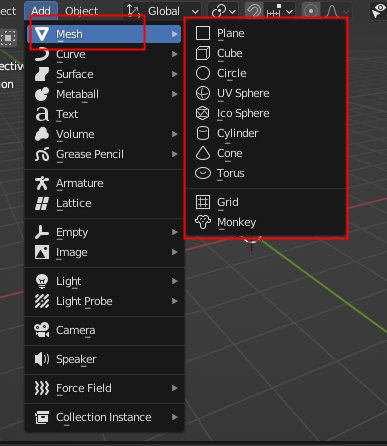
Choose the type of mesh you want to create (e.g., Cube, Sphere, Cylinder) from the Mesh submenu.
Step 3: Edit Mode
Select the object with a right-click and enter Edit Mode by pressing Tab.

In
Edit Mode, you can manipulate the vertices, edges, and faces to shape your
model. Use tools such as G for
grab, S for
scale, and R for
rotate.
Step 4: Extrude and Modify
Extrude faces, edges, or vertices to add complexity to your model. Press E to extrude.

Adjust
the position and shape of the model using the transformation tools.
Step 5: Add Details
You
can add additional details using tools like the Subdivision Surface modifier or
by manually adding loops with Ctrl + R.
Step 6: UV Unwrapping (Texturing)
Once your model is shaped, you may want to apply textures. UV unwrap your model in Edit Mode (U key) to prepare for texturing.

Step 7: Texture Painting (Optional)
Switch
to Texture Paint mode (T key)
and use the brush tools to paint textures directly onto your model.
Step 8: Shading
Go to the Shading workspace or Shader Editor to apply materials to your model.
Assign different materials to different parts of your model if needed.
Step 9: Lighting and Rendering
Go to the Layout or Rendering workspace to set up lighting. You can add lights from the Add menu (Shift + A) and adjust their properties in the Object Data panel.

Click
on the "Render" button to see how your model looks in the rendered
view. Adjust lighting and materials as needed.
Step 10: Save and Export
Save
your Blender project (File > Save).
To export your model, choose File > Export and select the desired file format (e.g., .obj, .fbx, .glb) based on your needs.

These steps cover the
basic process of creating a simple 3D model in Blender. Depending on your
project, you may need to explore additional features such as rigging,
animation, and more advanced modeling techniques. Blender has a wide range of
tutorials and documentation available to help you delve deeper into specific
aspects of 3D modeling.